Blog
What You Need To Know When Insulating Your Backyard Office Or Tiny Home
The difference between a simple shed that you spend ten minutes in, and a tiny home or backyard office that you spend ten (or more) hours in, is often the level of comfort it provides. This level of comfort starts by having an adequate level of insulation in your tiny build, which not only keeps it warm in the winter but it also helps keep the building cool in the summer.
Whilst you might think that adding some simple batts (fibreglass) insulation to the walls is all that is required, the amount of heat you will lose from your roof and floor will almost make your wall insulation pointless. A well insulated tiny house and office shed will have an overall ‘insulation plan’, with insulated floors, walls and roof (along with doors and windows which do not let draught in!).
This does not have to be difficult to achieve however, and we advise that you do not rush this step and skimp on the insulation in any part of the building. It is almost a case of “Do it right, or don’t do it” at all, and ideally you will consider insulation throughout each of the building stages. Having said that, if your build is already finished (and you are concerned that it contains little – or no – insulation), do not worry: our section “Insulating Already Built Tiny Homes And Office Sheds” covers how you can retrospectively apply insulation to turn your property into a nice, warm space.
Planning: What You Want To Achieve
Before going gung-ho and ordering the thickest, best (and most expensive!) insulation you can find, you might want to take a step back and plan things out a little more:
- Firstly, there is no point in ordering amazing insulation with a very high R-rating (the R-rating measures how resistant the insulation is to conductive heat) if it will be too thick for your timber studs and joists! You will want to measure out the depth of your timbers to ensure that your chosen insulation material will fit into them.
- Secondly, whilst insulation will keep your property cooler in hot weather (by not allowing as much heat in to the building), you still will not need as much insulation in Florida as you will in Alaska. This is because insulation is not perfect and some heat will still get through your walls (and into your property) when it is hot outside. Plus heat will come through your windows, too. So you will want to consider your area’s climate when deciding the thickness/quality of the insulation you are going to buy.
- Check the quality of your windows and doors, especially if you bought them used via Gumtree or Craigslist. If the frames have cracks, or the window panes are not the highest of quality, this will let in cold from the outside and make the rest of your insulation ineffective. You do not necessarily need to go out and buy high spec, triple-glazed doors and windows, but just be sure to double check that your windows and doors are not defective or too low-quality. And whilst it should go without saying, whilst single-glazed windows are fine for a simple storage shed, you will be spending a lot of time in your tiny house/backyard office, so you will need double-glazed windows.
- Insulating all areas (floors, walls and the roof) consistently is a key element in keeping your building cool in the summer and warm in the winter, so if you have any unique parts to your planned build which might make it hard to insulate part of your building, consider if design tweaks will allow you to insulate that area after all.
- You will need to run utilities (such as electrical cable) before doing the bulk of your insulation. We cover this in more detail in our general ‘Step By Step Guide: Building A DIY Backyard Office Shed’ guide.
Various Insulation Materials
There are quite a few different materials that you can use when insulating your tiny house and backyard office. Some materials do not make sense for insulating certain areas (batts/fibreglass roll insulation would be pointless under a fixed concrete slab, for example, because it would just get crushed and not offer any insulation benefit) and we cover the specifics in the following sections, but in general the different materials you can use for insulation (especially for the walls and roof) are:
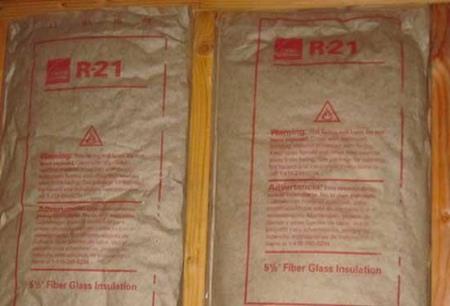
- Batts (fibreglass) insulation. This is the cheapest mainstream insulation option, and it involves running a roll of ‘fluffy’ (and itchy!) insulation between the timbers. This is easy to install because it is lightweight and flexible, and you can potentially run electrical cable after this step (even though it will be trickier than running it beforehand).
- Foam insulation board (PIR). This comes in a large board and it contains a range of insulating material. It usually offers a pretty good level of insulation for the price, although it is more expensive overall than batts (sometimes double the price).
- Spray foam insulation. A more specialist option, spray foam insulation involves bringing someone in who will use specialist equipment to spray expanding foam (with insulating qualities) over your walls and roof. It will then expand to fill the gaps, which you cut back slightly (if needed) to give a flush finish for the drywall stage. It leads to a high R-rating, although the price and labor involved is more than the other two options.
- Foil insulation paper. This is high quality, reflective paper which is made out of metal foil and it essentially ‘bounces back’ the heat and therefore has a decent level of insulation. Also called Sisalation paper, this can be a good option for warmer climates which do not require thicker insulation boards or batt rolls to do the job. It is also fairly cheap to buy, so as long as you apply it consistently to your walls and roof (i.e. you do not have any gaps), it should work well.
- Polystyrene/Styrofoam. The plastic-based sytrofoam (which is made from blown polystyrene material) which is used in packaging is also a fairly decent option for insulation. This is because it contains various air ‘bubbles’ which help to prevent heat moving in and out of the walls and roof. It can usually be bought in the same thickness which fits your wood studs/rafters as well, meaning it can be easy to install.
- Air barriers. You might have heard that air is a bad conductor of heat, meaning that if you were to create small gaps which contain air, then in theory this will be quite a good insulation option without a high price tag. This can be achieved by wrapping the outside of your building in housewrap, before applying the siding. The benefit of this is that it will prevent air movement through your walls, stopping any potential convection currents from forming (which is just a fancy way of saying it prevents heat coming through the walls!). This might work in a warmer climate which might not need tons of insulation, although it might not be the only option you want to go for in other climates.
- Bubble wrap. On the note of air being a bad conductor of heat, if we were to package air in small bubbles inside some sort of plastic wrap material… that would sound like a good thing for insulation, right?! Well as it turns out, bubble wrap is an option that people use for insulating their internal walls and roof. Some bubble wrap insulation also comes with a foam backing which has extra insulating qualities. To be honest, though, this is a cost effective option – but bubble wrap is not a great insulator. If you can afford it, go with another material (and just keep using bubble wrap when sending items via UPS!).
For a more detailed look at these different materials, check out our sister article. Having said that, the bulk of this article will cover the first two options (batts/fibreglass roll and foam board insulation) as these are the most common, although we thought it would be useful presenting the other options as well – especially since some of them are very popular in different parts of the world.
Insulating The Floor
It is easy to visualize insulation in-between your walls and above your ceiling drywall, although it is sometimes harder to remember that insulation can be paramount below the floor as well. This is because up to 40% of heat loss comes through the cold floor, meaning that subfloor insulation will really help improve the feel or your tiny house or backyard home.
In general, there are two main options for how your subfloor will be built:
- Concrete slab foundation. This is used to create a fixed foundation, so it naturally does not apply to tiny houses on wheels! But it is where tons of concrete is poured into the ground to make a level slab of concrete along the floor. A permanent tiny house will probably use this option, as will a larger-than-average backyard office.
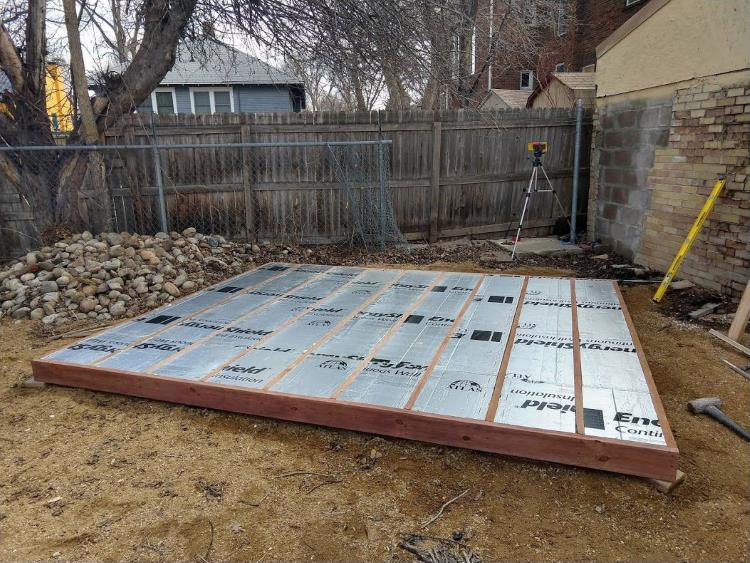
- Wooden subfloor. This easier option involves putting outdoor (water resistant) timber onto the floor or trailer platform, which can then be covered in plywood or OSB board to give a level finish. A tiny house on wheels and a standard office shed will tend to use this option.
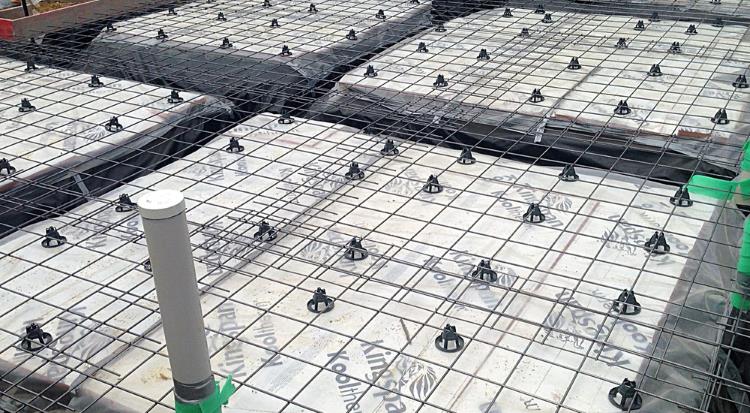
As we mentioned at the beginning of this article, you cannot use batts (fibreglass) insulation for your subfloor if you go down the concrete route because the concrete would crush the insulation roll down, leading to it having zero insulating properties (it needs to be uncrushed to work effectively). You can, however, use it for a wooden subfloor, although due to how much heat can be lost via your floor, many people opt for foam insulation (PIR) boards at this stage.
With a wooden subfloor, the insulation is cut up and wedged in-between each piece of timber before the finishing plywood/OSB layer is added:
With the concrete approach, you will generally want to put special concrete subfloor insulation boards in underneath the concrete: i.e. put it into the enclosure before any concrete is poured:
Insulating The Walls
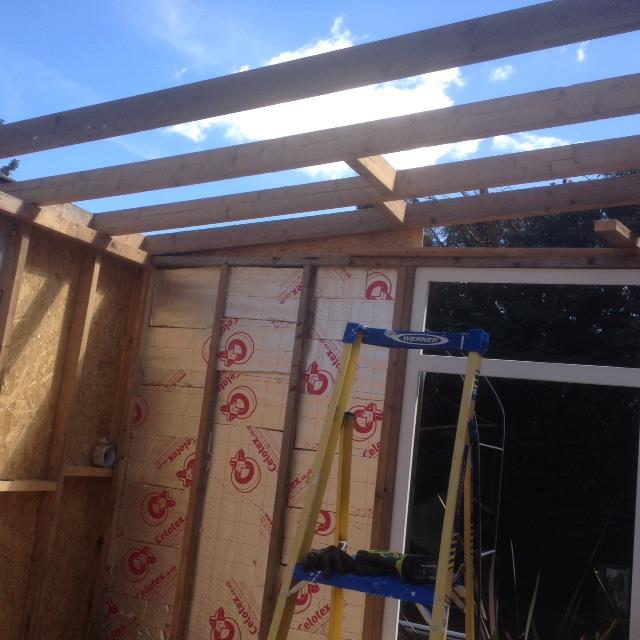
Insulating your walls is the same whether you are building a tiny home or backyard office: you will want to have insulation in-between your wall timbers so that there are no gaps where air could get through. This might include using foam insulation board which is trimmed to fit into all gaps:
Or you might be using batts (fibreglass) insulation which you will roll/position into position:
As long as you buy the correct thickness of insulation for your needs and you do not have any gaps in the insulation (which would mean the only protection from outside heat or cold would be the external sheathing), your tiny home or backyard office should be fairly warm at this stage due to the floor and wall insulation. However some people also opt to have extra wall insulation, by installing this externally after the sheathing is installed. In essence, you will be making a sandwich with sheathing and siding being the bread, and a thin layer of foam insulation board being the filling:

Insulating Doors And Windows
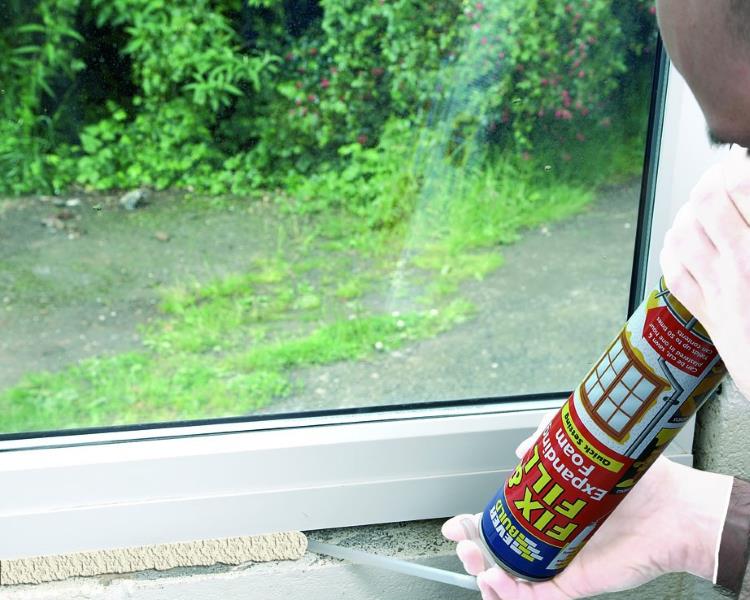
As we mentioned earlier, having good quality doors or windows is key: there is no point in fully insulating your floor, walls and roof if your cracked UPVC frames and poor quality window glass is letting in draughts and cold air! Beyond this, however, it is rare for the frame of doors and windows to fit perfectly flush against your timbers. There will almost certainly be small gaps between them the door/window frame and the timber.
This will also harm the overall insulation properties of your build, so be sure to fill in any such gaps with something like expanding foam. This can be bought in an easy-to-use spray can, and you can buy foam which is designed for insulation (although general purpose foam should work well enough, since you are mainly trying to block any gaps).
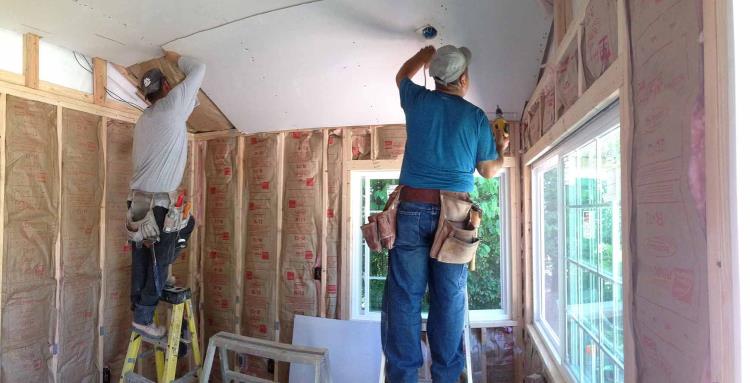
Insulating Your Roof
Insulating the ceiling of your tiny house or backyard office is pretty similar to the walls: you will want to fill any gaps between the timbers with insulation material so that warm air is kept in and cold air is kept out. So for the inside of your roof, you will put insulation material between the roof timbers which will be butted against the external sheathing. The insulation material will be held in place with adhesive, nails or screws as applicable.
You can, however, also insulate the outside of your roof if you choose to. Considering ventilation to prevent mold/damp build-up is important if you go down this route (as covered in the next section), although the general approach is also similar to the walls: insulation will be nailed/screwed into place on-top of the sheathing, before the roof material goes down. This option is less common and we would not recommend it unless having tons of insulation is very important to you.
Prevent Mold And Damp: Ventilation Is Key
Having your tiny home or backyard office packed full of insulation is a great thought, with it being nice and warm in winter whilst not being too warm in summer. However… and there is always a however!… if the building has no way of ‘breathing’ then there is the potential for damp/mold build-up. This can start to look something like the image to the right (looking at a bare roof without drywall).
We say ‘potential for damp/mold build-up’ because most damp/condensation occurs due to a difference in temperature between two surfaces. An example would be if you have a heater inside your tiny build: when running this, condensation can build up on colder materials (such as the wall and roof timbers) and cause mold over time. If your backyard office is relatively passive (i.e. does not require dedicated heating) then it might not be an issue, but an office shed with a heater – or naturally a tiny home (which will also produce moisture when cooking and showering) – will need ventilation.
The easiest way of adding ventilation is by installing wall vents (whether down near the floor, or closer to the ceiling), and these are commonly seen in kitchen and bathroom areas near the ceiling. Simple/passive wall vents will be adequate for buildings which should not generate moisture too regularly (i.e. a typical backyard office), but powered options like mechanical extractor fans and cooker hoods will be required for buildings which are regularly used (i.e. a typical tiny house).
In addition, assuming that you have installed insulation between your roof rafters (as recommended), some country’s building codes (including America’s) says that you must do one of two things:
- Ensure a ventilation channel is included between the roof insulation and the external roof sheathing. This is to ensure that air still has a pathway out of the building, which is especially important for warm air (which naturally rises) – otherwise you will have lots of warm air hitting your cooler roof insulation and timbers, with nowhere to go: leading to condensation build up.
- Install a thick layer of foam/rigid board insulation on the outside of your roof. The idea is that this will help warm your roof area, and hopefully help to match the temperature inside the building: thus meaning that condensation should not form.
The first option is usually best, since even in cold areas it is good to have buildings that can ‘breath’ and have a natural movement of air throughout the building.
Finally, you can buy thin membranes such as house wrap/breathable sheets which you install on the outside of the walls/roof as needed, before the external siding goes on. You can also get vapor barriers which go between the wall/roof insulation and drywall and helps to prevent moisture from getting into the timber behind the drywall. There is unfortunately no clear-cut rule which means that you should always use membranes and vapor barriers: the weather in some climates mean that they are recommended, whilst in some other areas they could be harmful to use. Check your local building codes and speak to local friends/family if you are unsure.
Insulating Already Built Tiny Homes And Office Sheds
You might have noticed that your tiny home is too cold in winter, and possibly too warm in summer. Or you already have a backyard shed, and are planning on converting it to an office shed. Either way, you will need to review the insulation and aim to add more to make it a more comfortable living/working space overall. But it is naturally impractical to dismantle your entire tiny build and start again, hence we have given the advice below so that you can increase your building’s insulation without huge outlay:
- Look at changing from colder flooring materials like wood and tile into warmer materials such as carpet. Using a thick carpet underlay and a decently thick carpet will definitely help to reduce cold rising up from the floor. Rugs and mats also have a similar effect.
- If you do have a wooden subfloor and an easy-to-lift flooring material (like carpet), then you could potentially roll back parts of the carpet, remove sections of the plywood/OSB and then add insulation between the flooring timbers each area at a time. Whilst this is trickier than lifting the whole floor in one go, it will be less effort and much less disruptive.
- The walls and roof are harder because you either need to rip off your drywall (destroying the decoration in the process), or build a fake wall all the way around: i.e. add extra wall/roof timbers, add insulation in-between this, and then add drywall back on top. This is an option that would work, however it will be disruptive – plus you will lose 4-6” (10-15cm) from your inside space by having ‘new’ walls on each side. This therefore might not be an option in a tiny build where space is key!
- The other option for your walls and roof is to go external and add exterior insulation. This will involve removing the external siding and roofing material, and then adding insulation on-top of the sheathing – before re-adding the siding/roofing. Whilst this sounds like a hassle, if your siding and roof are simply screwed in, this might be less effort than you would think.
- Blinds and curtains are a good way of blocking out some heat loss from your windows, and some people even have curtains around their front door (which is naturally more down to personal preference: only do this if you like the look of this!). So adding good quality blinds and thermal-lined curtains will help to naturally increase the insulation levels inside your property.
Handy Video Guides
We found the following video guides useful for insulating tiny builds: