Blog
Ultimate Tiny House Kitchen Guide
Decades ago, the kitchen was just a working area: somewhere for a busy adult to create lots of food, serve it out in a separate dining room and finally do all the washing up (ugh!). This has all changed: the kitchen is now almost the beating heart of family life, with ‘kitchen diners’ being common, and friends and family often standing around talking in the kitchen whilst food is rustled up.
However when space is at a premium inside a tiny house, it is all too common for the kitchen to revert back to the functional, working nature of times past. Whilst this is understandable, it does not have to be this way. This free guide explores how a tiny house kitchen can be a useful space which is more of a family area.
When you buy through links on our site, we may earn an affiliate commission. As an Amazon Associate I earn from qualifying purchases.
The Problem: Lack Of Space
A typical tiny house kitchen might be 8’ 6” x 7’ (2.6m x 2.1m), such as the one in the Tumbleweed Farallon 26’ Vista L1 house:
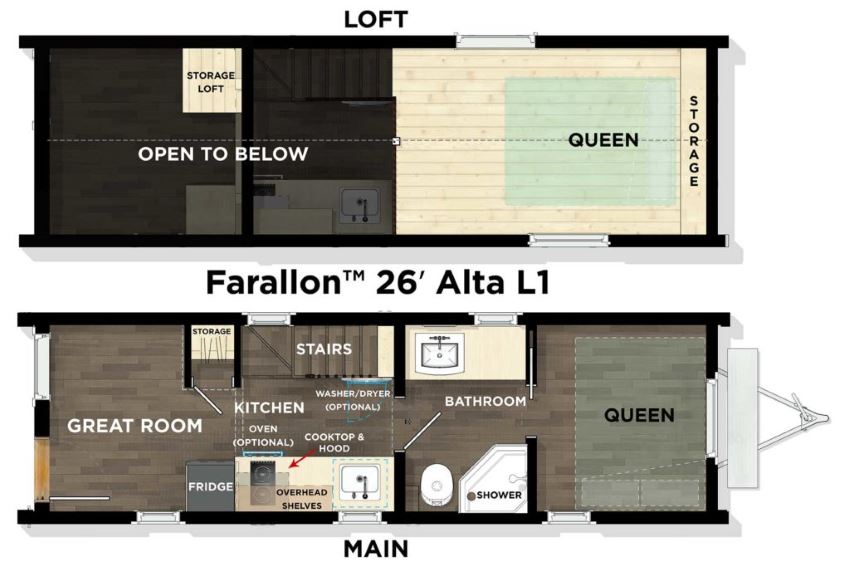
Anyone who has planned or installed a kitchen will know that 60 square foot (5.5 square metres) is not much at all, however this is the reality in many tiny houses. After all, there is usually a set width otherwise the tiny house could prove too tricky to transport on public highways. And even if it is 26’ or longer, there still needs to be living/sleeping areas – along with a bathroom, taking a bunch chunk of space out of the downstairs and away from the necessity of a kitchen.
This problem is compounded when you realize that the actual width will be reduced by 10 ¼” (26cm) after the external wall thickness on both sides is taken into account, meaning the actual, usable kitchen width will be just 7’ 8” (or 234cm). Base (floor) kitchen cabinets are 24” deep (60cm) meaning that if you had such cabinets on both sides, you might have as little as 4 foot (123cm) of usable width in your kitchen.
Assuming that you now have your hands in the air measuring out the distance and are thinking “that does not sound too bad”, consider that the moment you open a couple of cabinet doors, you will start running out of space. Equally, 4 foot quickly becomes less than 2 foot when you have someone busily cooking in a kitchen – making it hard for people to squeeze past to go to/from the bathroom. The idea of having family and friends stand around whilst food is rustled up will also be impractical.
So what is the answer? Well that is what this guide aims to help you out with.
Tiny House Kitchen Storage (12 Handy Ideas)
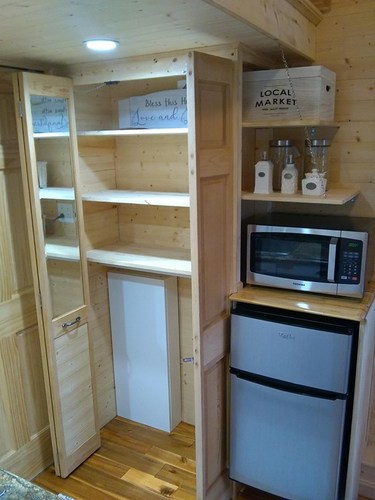
The basic idea behind maximizing storage space within a tiny house kitchen is the same as in a standard size house: have as many floor and wall-mounted cabinets as you can. You can never have enough storage space for your pots, pans, utensils, plates, cutlery, food… and dozens of other kitchen items! But we also find the following kitchen storage tips ideal within a tiny house:
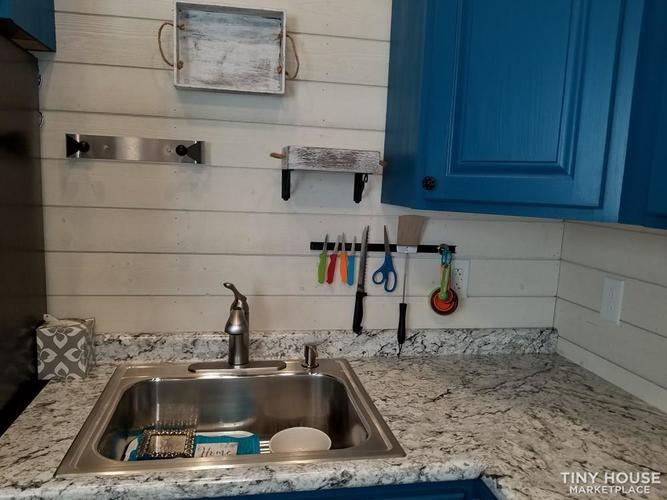
- Put shelves wherever you can, even if they just 6” (15cm) below a wall-mounted cabinet. These could be perfect for storing small items such as herbs and spices.
- You can have wall-mounted cabinets above fridge-freezers, extraction hoods and HVAC units (assuming vents are not blocked). Many people do not consider doing this, but you might be able to gain three or more cabinets by doing this – giving really handy extra storage potential.
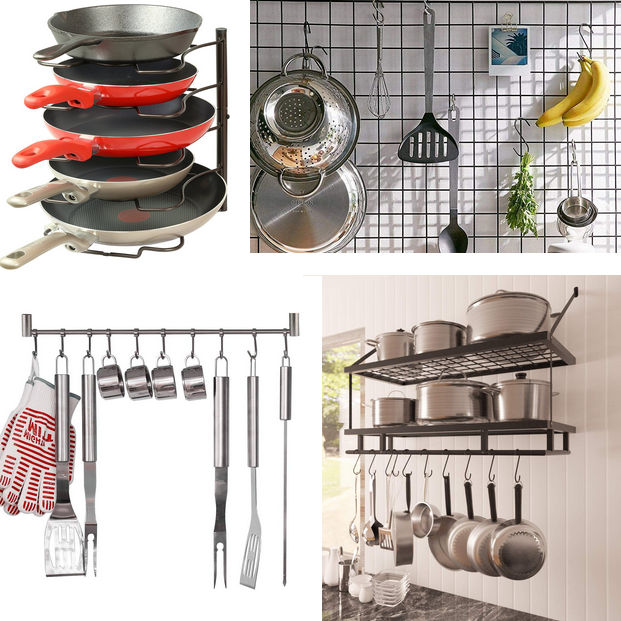
- Wall mounted storage solutions are a great idea, and are particularly useful for storing cooking utensils which otherwise take up quite a bit of space in drawers. There are a few different types, all of which do similar jobs:
- Wall rails.
- Wall hooks.
- Pot racks (which include a top shelf for pot storage, then dangling hooks below for other items to be hung).
- Wire wall storage, such as this convenient rack.
- Vertical pot/pan holder, such as the patented one from SimpleHouseware:
[amalinkspro type=”showcase” asin=”B08B3K75LV” apilink=”https://www.amazon.com/dp/B08B3K75LV?tag=sth078-20&linkCode=osi&th=1&psc=1″ new-window=”true” addtocart=”false” nofollow=”true” sc-id=”4″ img-sizes=”500:500″ imgs=”https://m.media-amazon.com/images/I/41sdh6RvAwL._SL500_.jpg” link-imgs=”false” specs=”Simple Cookware Organization – Tidy up your kitchen with a simple and ingenious organization solution that will turn your small space into a functional more efficient working space. Total length is 37 inches after assembly, long enough to keep your home organized with Greenstell simple hanging organizer~~~Heavy Duty Rack – The heavy industrial iron construction will help you to hang your heavy kitchen supplies. The rack maximum loading capacity can up to 132 LBS, so you can hang your cast iron cookware with ease~~~S-shaped Pot hooks – S-shaped hooks with hot-melt plastic coating will keep the hooks from falling off easily, you can easily store and reach for your cookware, the hooks will stay on the rack when you remove your pans. You won’t have to go through the hassle of putting the hook back on the rail each time you reach for your pots and pans~~~Multi-Purpose Hanging Rod – The hanging cookware storage rod will bring you one step closer to a neat and tidy kitchen set-up. Ideal for using in your kitchen, closets, bathroom, bedroom, garage, foyer or entryway etc~~~Easy to Install – Each package comes with all kits needed, includes 10 screws – 2 types for concrete ceiling or wood ceiling, 14 pieces black heavy duty S shaped hooks, 2 pieces threaded pipe, 2 pieces 90 degree elbow pipe, 2 pieces pedestals, 1 piece connector. Following the instructions and your kitchen utensil rack will be ready to use in a few minutes!” btn-color=”#ff9900″ btn-text=”Check Price on Amazon!” alignment=”alignnone” hide-prime=”0″ hide-image=”0″ hide-price=”1″ hide-button=”0″ width=”750″]Greenstell Pot Rack with 14 S Hooks, 37 inch Wall Mounted Hanging Pot Rack, Industrial Pipe Hanging Rail for Kitchen Pot & Pan Lids, Multi Functional Wall Mounted Organizer Rack (Black 1 Pack)[/amalinkspro]
[amalinkspro type=”showcase” asin=”B0751RPD3V” apilink=”https://www.amazon.com/dp/B0751RPD3V?tag=sth078-20&linkCode=osi&th=1&psc=1″ new-window=”true” addtocart=”false” nofollow=”true” sc-id=”4″ img-sizes=”498:500″ imgs=”https://m.media-amazon.com/images/I/41kGITnTAGS._SL500_.jpg” link-imgs=”false” specs=”INCLUDES – 9 hooks, 12 medium indoor strips; 1 hook holds 3 lbs~~~DAMAGE-FREE ORGANIZATION- Say goodbye to holes, marks, or sticky residue on your walls, doors, cabinets, or closets; Command Hooks by 3M are easy to use and help keep your walls looking beautiful~~~NO TOOLS REQUIRED- Hang clipboards, brushes, dog leashes, kitchen utensils, and accessories where you want without nails or a hammer~~~STRONG AND VERSATILE- Command Utility Hooks hold strongly on a variety of indoor surfaces including painted walls, finished wood, glass, tile, metal, and other smooth surfaces~~~REMOVES CLEANLY- Reorganize when inspiration strikes; These wall hooks leave no sticky adhesive behind; Perfect to use inside cabinets and closets, in your college dorm, apartment, home, and off” btn-color=”#ff9900″ btn-text=”Check Price on Amazon!” alignment=”alignnone” hide-prime=”0″ hide-image=”0″ hide-price=”1″ hide-button=”0″ width=”750″]Command Medium Utility Hooks, White, 9-Hooks, 12-Strips, Organize Damage-Free[/amalinkspro]
[amalinkspro type=”showcase” asin=”B00DY4S2YA” apilink=”https://www.amazon.com/dp/B00DY4S2YA?tag=sth078-20&linkCode=osi&th=1&psc=1″ new-window=”true” addtocart=”false” nofollow=”true” sc-id=”4″ img-sizes=”500:500″ imgs=”https://m.media-amazon.com/images/I/51zdcJXZu0L._SL500_.jpg” link-imgs=”false” specs=”Has a 36 inch base that is made of 6 wood tracks and is held by 2 wall mounts~~~Includes 6 swivel hooks that rotate 360 degrees; Supports around 30 pounds~~~Brackets/hooks are made of solid cast aluminum to match kitchen style/cookware~~~Natural wood track is durable and smooth; Can place cookware flat and vertically~~~Easy installation with phillips screwdriver; Extra hooks available, purchase separat” btn-color=”#ff9900″ btn-text=”Check Price on Amazon!” alignment=”alignnone” hide-prime=”0″ hide-image=”0″ hide-price=”1″ hide-button=”0″ width=”750″]Cooks Standard Wall Mounted Wooden Pot Rack, 36 by 8-Inch[/amalinkspro]
[amalinkspro type=”showcase” asin=”B08K858GMJ” apilink=”https://www.amazon.com/dp/B08K858GMJ?tag=sth078-20&linkCode=osi&th=1&psc=1″ new-window=”true” addtocart=”false” nofollow=”true” sc-id=”4″ img-sizes=”500:435″ imgs=”https://m.media-amazon.com/images/I/51E+X36l+ML._SL500_.jpg” link-imgs=”false” specs=”WALL GRID DECORATION – Its a multi-functional wall grid panel. It can make your room unique and stylish, add some color to your life.Use our product to create gorgeous and fun displays. Some of the best moments are worth remembering forever.Create your personal memo board with the wall grid photo display panels. Black color is a wonderful base and matches ant theme.~~~WHAT YOU GET – 37.4 x 17.7 inches 1 black grid panel, 4 x S Hook, 4 x Nails ,1 x Hemp Cord, 4 x Binder Clip, 10 x Wood Clip,1 x artificial leaf ,1 x Instructions. Provide a nice display and layout with rich accessories.~~~PERFECT DESIGN – These grids can be used to create a vertical storage space on the wall as well as photo postcard display or holiday decoration and small items organizer. For Halloween, add spider webs, pumpkins and other cute decor! You can do the same for Christmas, Easter, and Thanks giving too. A large, rectangle to leave room for creative displays! Hang photos, postcards, memos, or inspirational quotes!~~~HIGH QUALITY MATERIAL – It provides you with easy installation with suitable screw slots on 4 corners. Wire Wall Grid Panel adopt high quality painted metal and electroplated technology makes it very sturdy. Smooth surface, shiny, very good touch. no fading, no corrosion.~~~ALL OUR PRODUCTS GO ON ONE CONTROL – For the satisfaction and love of our valued important customers, our team is constantly working to deliver all our accessory parts and our main group without any problems. We guarantee %100 customer satisfacti” btn-color=”#ff9900″ btn-text=”Check Price on Amazon!” alignment=”alignnone” hide-prime=”0″ hide-image=”0″ hide-price=”1″ hide-button=”0″ width=”750″]PLTz Art Wire Wall Grid Organizer for Photo Hanging Display and Wall Storage Organizer, Metal Grid Photo Wall Panel, Wire Mesh Memo Board, Picture Holder, Aesthetic Desk Decor, (37.4×17.7 inch-Black)[/amalinkspro]
[amalinkspro type=”showcase” asin=”B01K07MZPK” apilink=”https://www.amazon.com/dp/B01K07MZPK?tag=sth078-20&linkCode=osi&th=1&psc=1″ new-window=”true” addtocart=”false” nofollow=”true” sc-id=”4″ img-sizes=”436:500″ imgs=”https://m.media-amazon.com/images/I/51v81ccxBnL._SL500_.jpg” link-imgs=”false” specs=”Great pan organizer to save cabinet and countertop space, stores up to 5 pans~~~Varied Installation: Free Stranding includes Vertical or Horizontal installation~~~Allowed to be secured to a fixed position by incerting a screw into the bottom screw hole, hardware included~~~Dimension: 8.75 W x 9 D x 12 H, Compartments Height is about 2.5 to 3~~~USPTO Patent No: USD823″ btn-color=”#ff9900″ btn-text=”Check Price on Amazon!” alignment=”alignnone” hide-prime=”0″ hide-image=”0″ hide-price=”1″ hide-button=”0″ width=”750″]SimpleHouseware Kitchen Cabinet Pantry Pan and Pot Lid Organizer Rack Holder, Bronze[/amalinkspro]
Mount wine racks underneath wall-mounted cabinets, which (same as our shelf idea – see #1) barely requires any vertical space to be taken up. Consider replacing a single wall cabinet with a wall-mounted plate and cup holder. They can be much more convenient than a general purpose cabinet, as storage will be much more organized. Plus you can more easily access your oft-used plates and cups. The microwave does not have to be in the kitchen area. Whilst this might look odd, microwaves can take up a fair amount of space. If you are able to move it somewhere else, this can free up some valuable worktop space. If you have any half-height walls where both sides are available (such as those which form a breakfast bar or dining booth), building storage into the back of the wall can be a great idea. This is what the Little Red Hen Cabin done and it works well: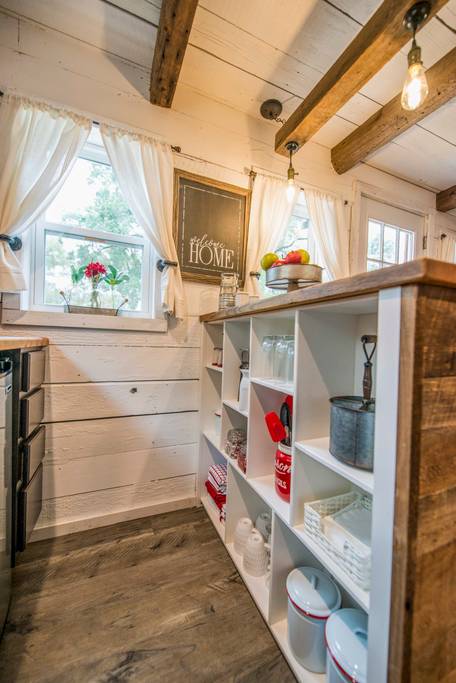
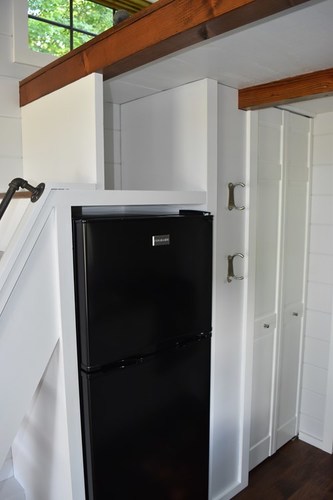
- Consider fitting the fridge-freezer below the stairs (well, at the very top part of it, otherwise you would need a mini-fridge!). This can free up a valuable 23” (60cm) of space for your kitchen, and can even work if you go for Tansu stairs as you can just include a big ‘box’ area for the fridge-freezer.
- Lots of light. It is a trick of the eye, but the more light you have, the bigger your kitchen will feel – and the happier you will feel in it. This means that lighter color cabinets and worktops are good, as are windows and good quality lights.
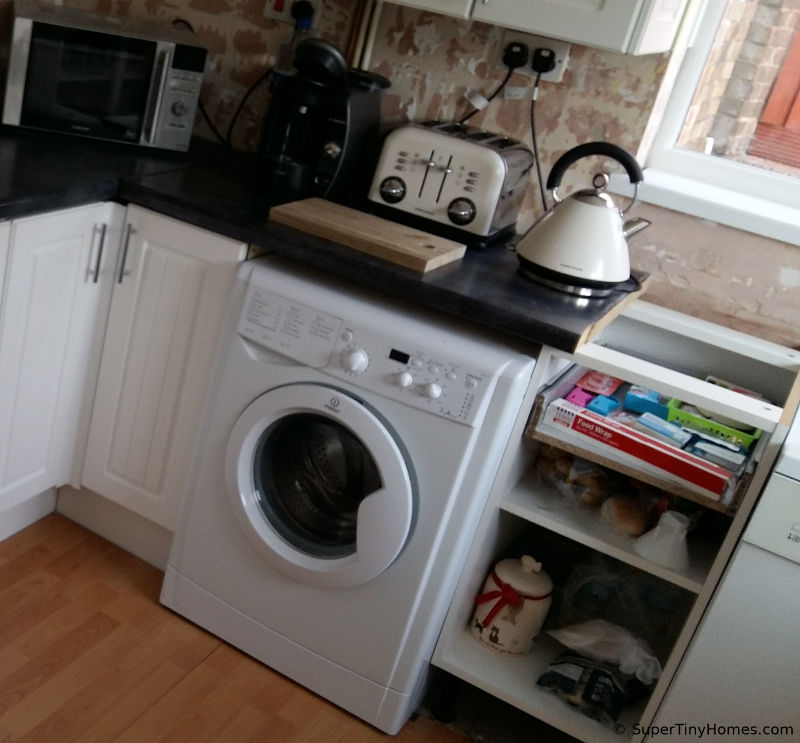
- Having a ‘utility room’ type area in your bathroom might sound weird, but it can actually work well and feel natural. Assuming you have the space, this might involve having a worktop area and a cabinet and washing machine below it.
- Kitchen cabinets without doors are a good way of avoiding the problem of doors getting in the way! As long as you do not have young children, this can work really well and can actually add to the character of your home.
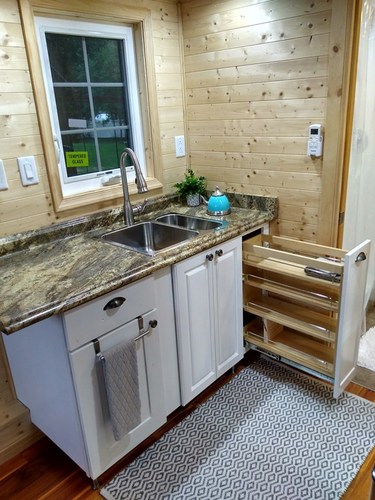
- In-cabinet pull out storage shelves/racks are getting more popular, and they are another great place for storing small items.
Tiny Home Kitchen Worktop Depth
A kitchen worktop/counter is made up of placing the worktop on top of a base kitchen cabinet:
The depth of the cabinet will – naturally – determine the overall depth. It is standard for a kitchen cabinet to be close to 24” (60cm) and worktops to be a similar, however as we explored earlier, this can be too much space for a typical tiny house. Hence many tiny house owners opt for 18” or 21” deep cabinets and worktops, cutting away the back (where the cuts are not visible) to trim their depth. You will equally need to cut the worktop depth, too, so a wood-based worktop is ideal.
Cutting the cabinet and worktop is not straightforward, however, because the cabinet will probably have joints at the back that you will have to re-create when cutting it. So unless you are a competent DIYer, either hire a contractor to do this or look for cabinets with a smaller depth. Pro tip: you can often use wall cabinets as base units, just by adding feet to their bottom (which can often be purchased separately). Wall cabinets usually have a smaller depth, meaning they can deliver a thinner kitchen with minimal sawing.
An example of this is that some IKEA base cabinets have a depth of just 15” (38cm). This might be too small for some people, but if you see it in-store and you could imagine them in your tiny home, they might be ideal. After all, if you have 15” cabinets on either side, you would have saved a total of 18” (46cm) in space compared to have two lots of 24”-deep cabinets.
Kitchen Sink
Having the smallest possible kitchen sink might seem logical in a tiny house. After all, space is precious in the kitchen of a tiny house and a large sink will take away valuable worktop space! This line of thinking is fine until you do any serious cooking or have more than a few plates and glasses to wash up! You will then find that a bigger sink is invaluable.
A double sink is the most practical because you can leave heavily soiled plates to soak whilst freely using the other sink, however this might require too much space: a double sink is usually 33” (84cm), rising to 48” (122cm) if it includes a drainer!
The other two options might be more tiny house friendly:
- Go for a “one and a half sink”: this is where the second sink bowl is – you guessed it! – half the size (or even smaller) compared to the other one. The benefits are clear: you still get two usable sink areas, but with less space being taken up overall. They will be less than 30” (76cm) without a drainer or around 40” (102cm) with a drainer.
- Go for a single sink, which is typically anywhere between 16” (41cm) to 21” (53cm) without a drainer. For washing up, either buy a sink with a drainer or consider a handy over-the-sink dish drying rack which can then be hung up when not in use:
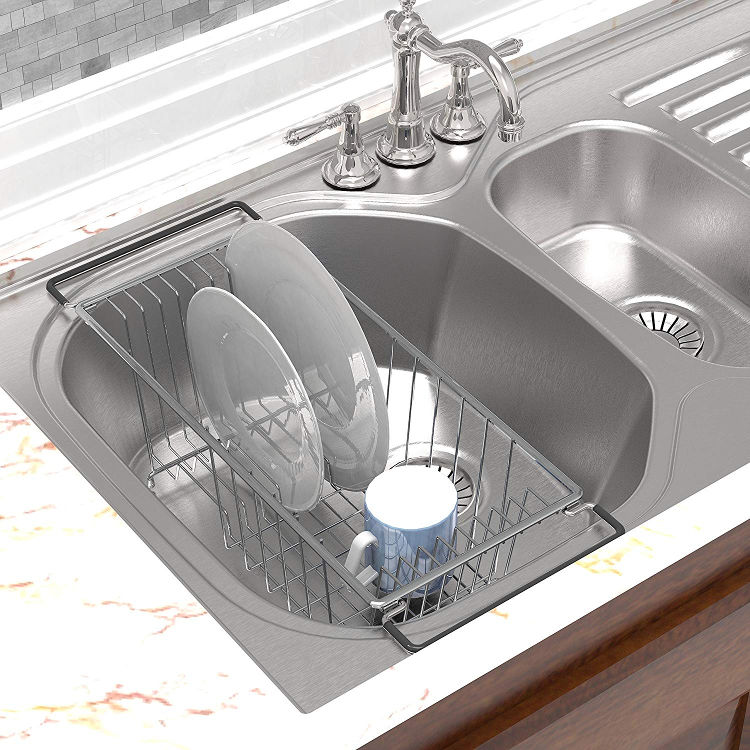
[amalinkspro type=”showcase” asin=”B07T29WD55″ apilink=”https://www.amazon.com/dp/B07T29WD55?tag=sth078-20&linkCode=osi&th=1&psc=1″ new-window=”true” addtocart=”false” nofollow=”true” sc-id=”4″ img-sizes=”500:500″ imgs=”https://m.media-amazon.com/images/I/51cTtlVUZKL._SL500_.jpg” link-imgs=”false” specs=” 3-IN-1 FUNCTION—TOOL dish drying rack combined with 3-IN-1 design, it can use with the drying mat on the counter, in the sink or expandable over the sink. Non slip extendable rubber arms and feet protects the counter and sink from scratches.~~~ PREMIUM QUALITY—Made of high quality metal meterial, the surface is pre-coated to eliminates rust, corrosion, acids and alkali damages to ensure long lasting durability.~~~ SPACE SAVER—Drainer has 9 slots that hold dinner plates upright, 8 for side glasses holder and includes a removable utensil holder, more convenient to oganize your utensil. Perface for small kitchen sink.~~~ ADJUSTABLE SIZE—The unit (not expanded) measures 13.8 L x 10.7 W x 4.1 H. The extendable arms can expand to 3.54 length (one handles fully pull out). Maximum length is 20.86.~~~ WARRANTY GUARANTEE—We stand by the quality of TOOLF products and promise to provide 100% satisfaction service to all customer.” btn-color=”#ff9900″ btn-text=”Check Price on Amazon!” alignment=”alignnone” hide-prime=”0″ hide-image=”0″ hide-price=”1″ hide-button=”0″ width=”750″]TOOLF Expandable Dish Drying Rack Over The Sink Adjustable Dish Rack in Sink Or On Counter Dish Drainer with Utensil Holder Rustproof for Kitchen[/amalinkspro]
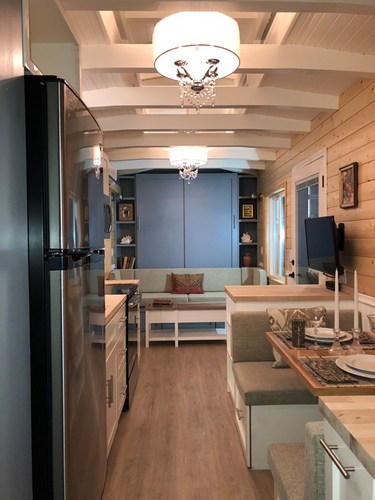
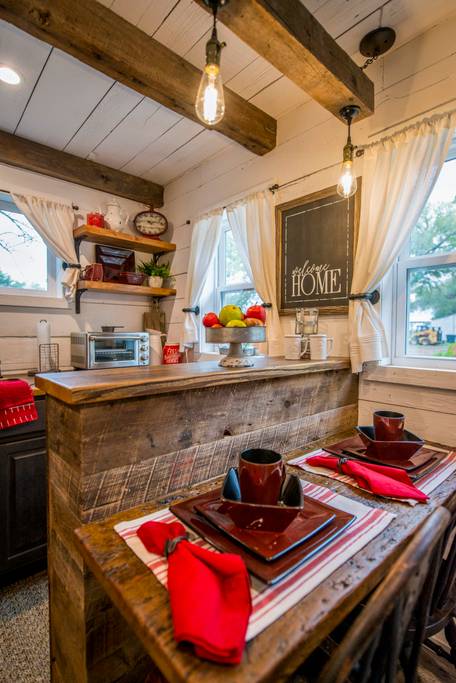
Kitchen Table: Still Possible In A Tiny House?
Having a kitchen (or dining room) table in a tiny house sounds like a pipe-dream. They are big, bulky and require 4+ chairs (which themselves are big and bulky), right? Well, that is true of traditional dining room tables, sure. But in a tiny house it is still possible to have a table, you just need to get creative. For example, we love the dining booth from the California tiny house in our image gallery earlier:
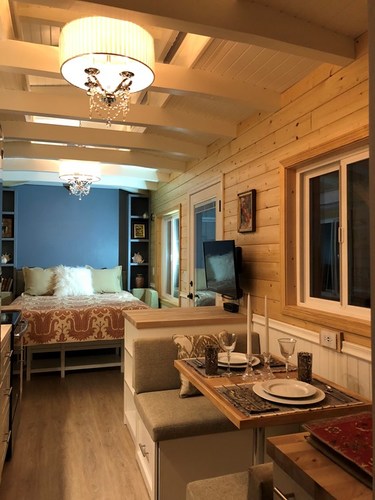

This has a kitchen cabinet/storage unit at the far end, with space then sacrificed for this purpose-built dining booth with table, before the kitchen cabinets and worktops carry on. This naturally depends on how much space you have, but this option is definitely possible in a THOW.
The other is to look at a folding table and chair set, of which there are hundreds of different options. However the main things to consider are:
- Where to store them when they are not in use?
- How much space they take up when folded.
- How heavy they are.
The obvious answer to #1 is to store the table and chairs in the loft area when they are not in use, but this comes down to #2 and #3: if they are fairly big and heavy, moving them up and down from the loft might not be practical.
You can also get fold-out tables which will just sit against the wall when they are not in use. Combining these with stools (which can be fairly easily stored away) can work quite well for one or two people eating.
Compact Kitchens: “Made For Hobbits, Ideal For Tiny Houses”
Okay, joking aside: “Made for hobbits, ideal for tiny houses” is not a real marketing strapline for kitchen retailers, but you can get a range of compact kitchens which work just fine for full sized adults. They are just that little bit smaller and so they fit really well into a tiny house. Just search for kitchen cabinets which are 12-18” deep (with 15” and 18” being the most popular ‘compact kitchen’ depth), or try speaking to a local kitchen supplier and see what mini kitchens they offer (or know about).
Equally, you can get slimline appliances such as dish washers and washing machines, along with compact fridge-freezers which are thinner and less tall than typical ones. These can be purchased from most major retailers, but if you find the ones they offer are still too big, consider looking for “RV friendly” shops and kitchen companies as their products will more likely fit into a tiny house.
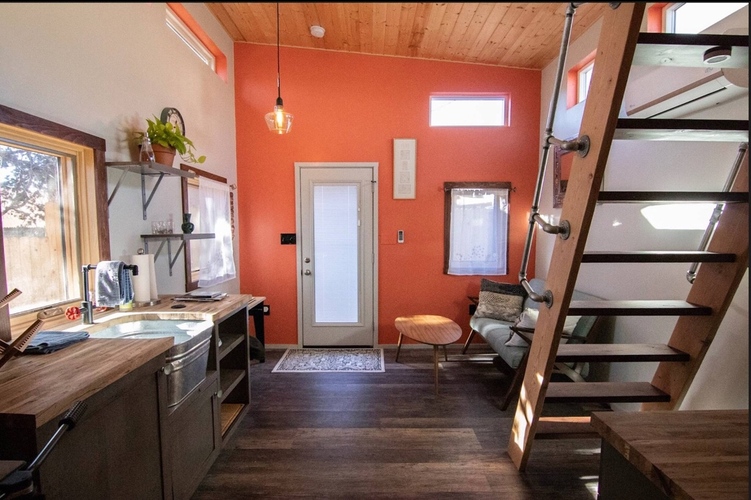
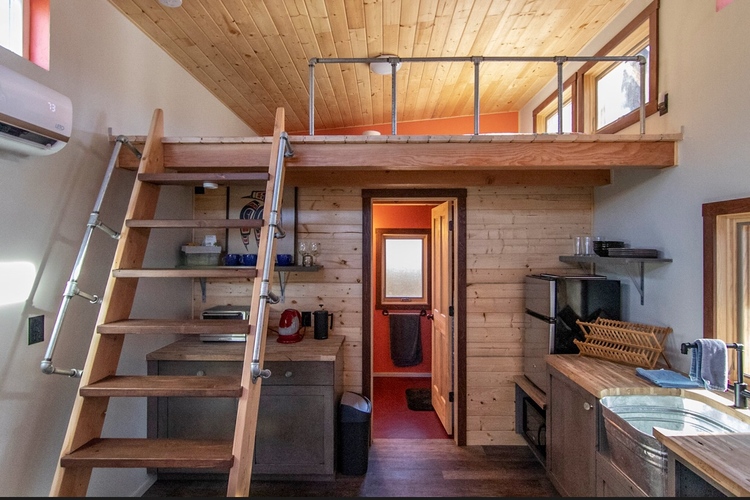
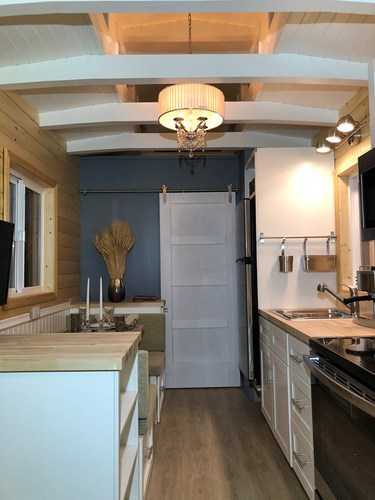
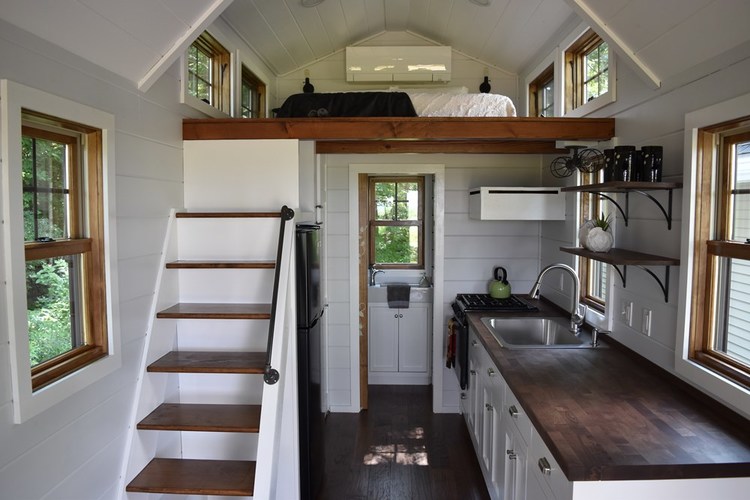
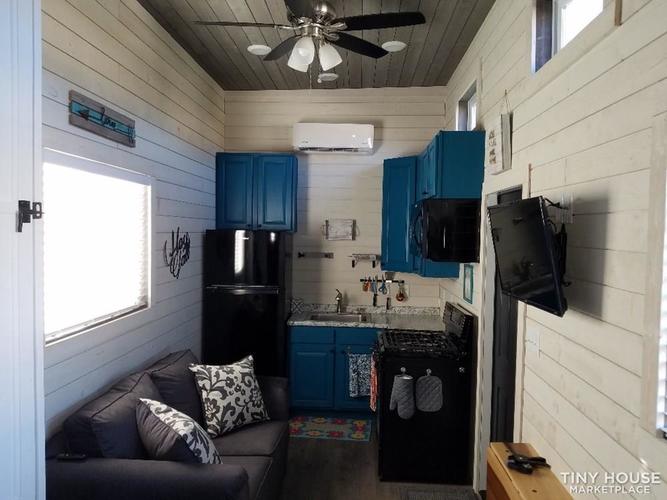
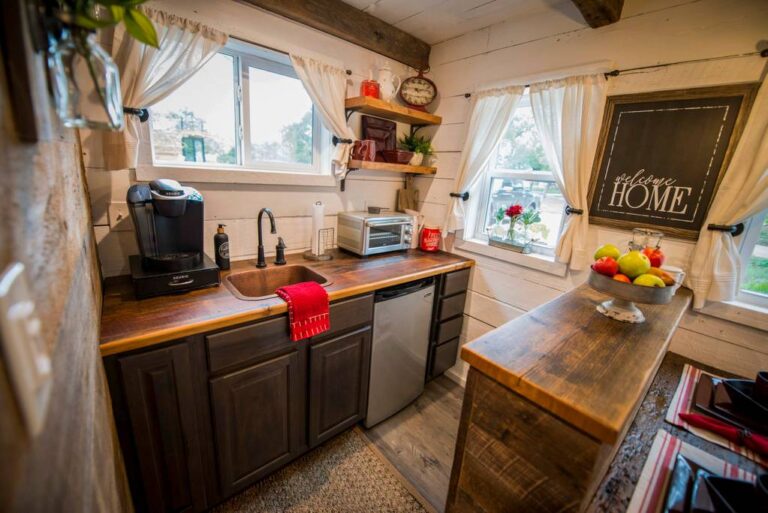
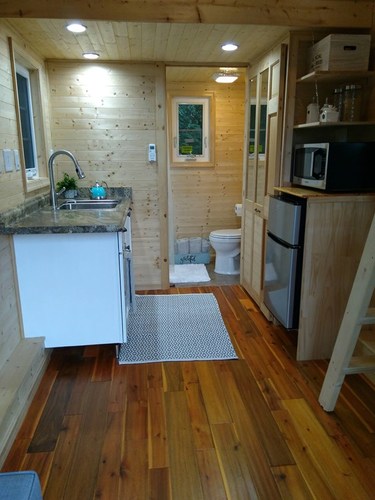
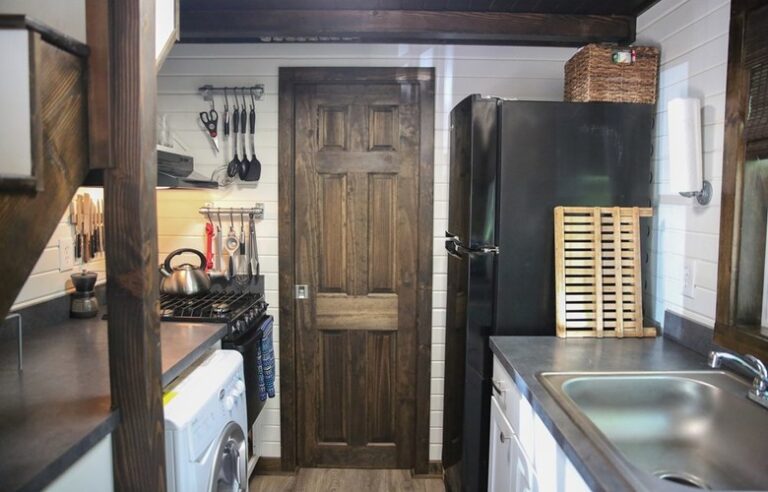
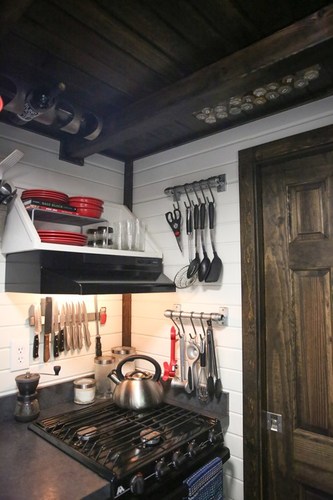
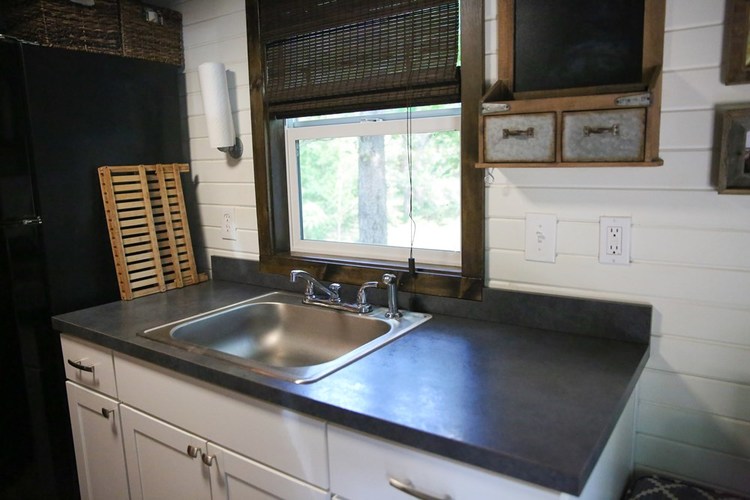
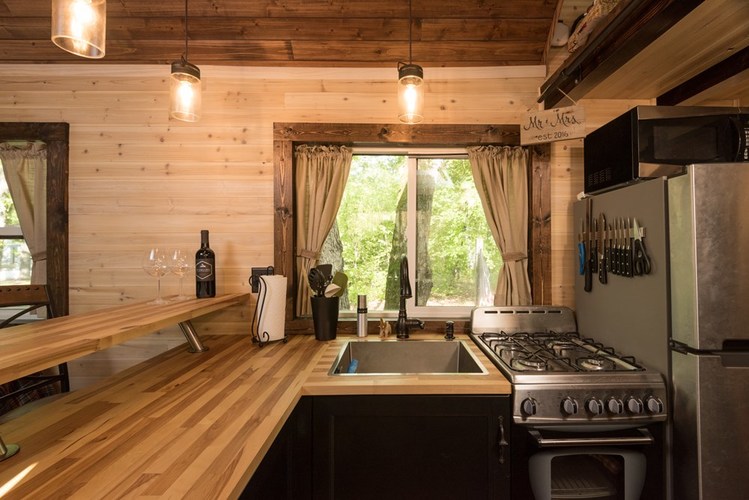
Useful Kitchen Layouts (With Photos & Videos)
The main thing to remember when planning out a tiny house kitchen is to maximize storage space with as many floor and wall cabinets (and shelves) as you can. Do not be frightened to have ‘kitchen’ features outside of the traditional ‘kitchen area’, such as a breakfast bar in the living area or kitchen cabinets in a combined bathroom-utility space.
Having said that, also be sure to consider whether you have enough room for:
- People walking past you when cooking or opening cabinets.
- People standing around talking to you whilst you are cooking.
- The space taken up by open cabinet drawers and doors (after all, it is often convenient to leave them open whilst cooking).
It will probably be impossible to cater for all these possibilities within a tiny house: just be conscious of these when planning your kitchen, and also living in your tiny house. For example you might find that it is impractical to rustle up food whilst friends stand around talking to you. In this case, do not be scared to set some ‘ground rules’ and explain that the limited space means that it is better if you finish the cooking alone.
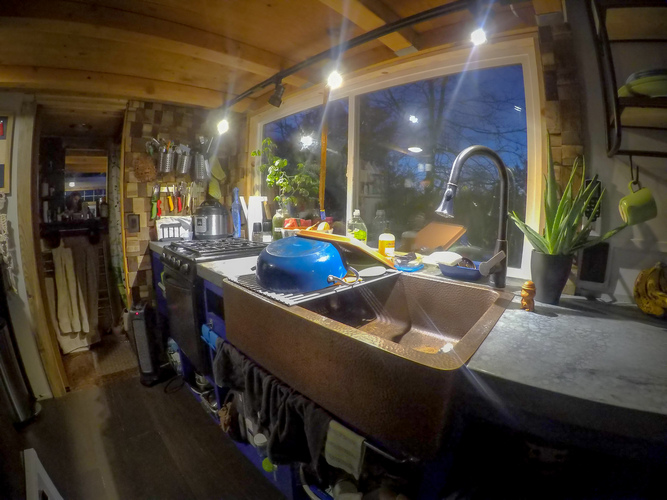
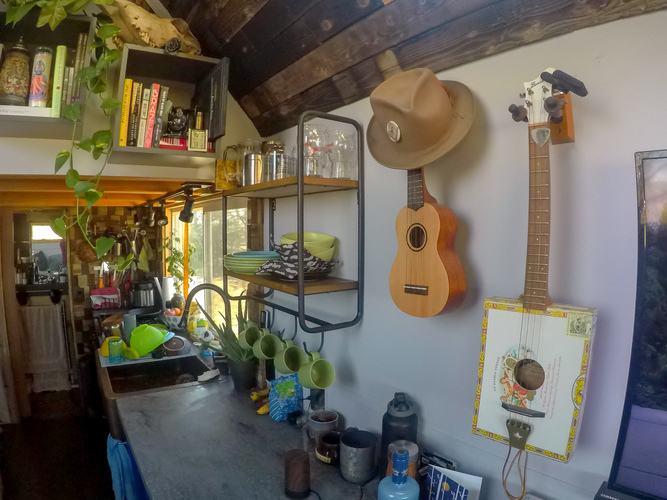
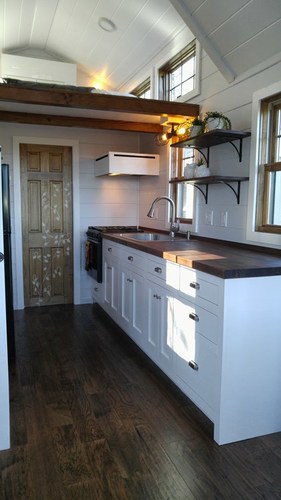
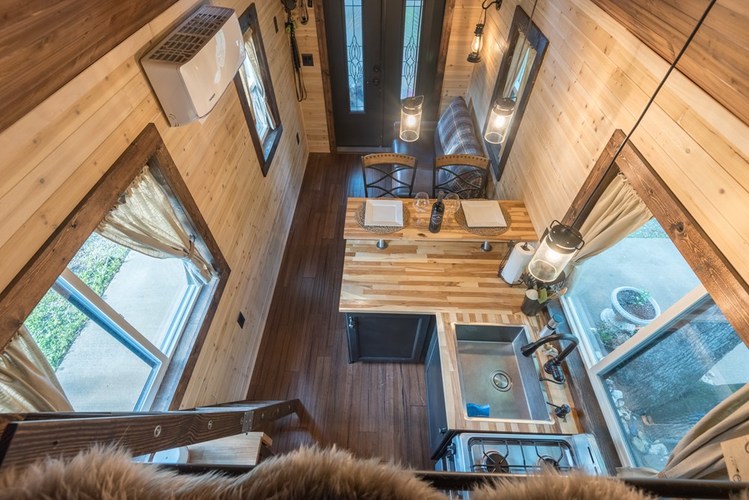
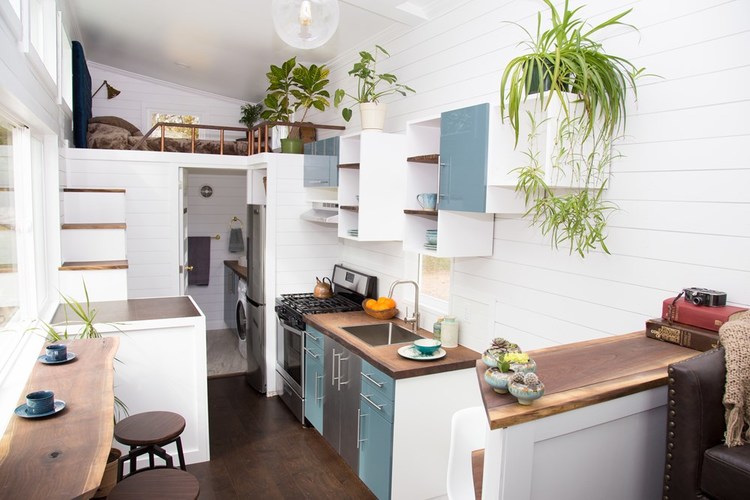
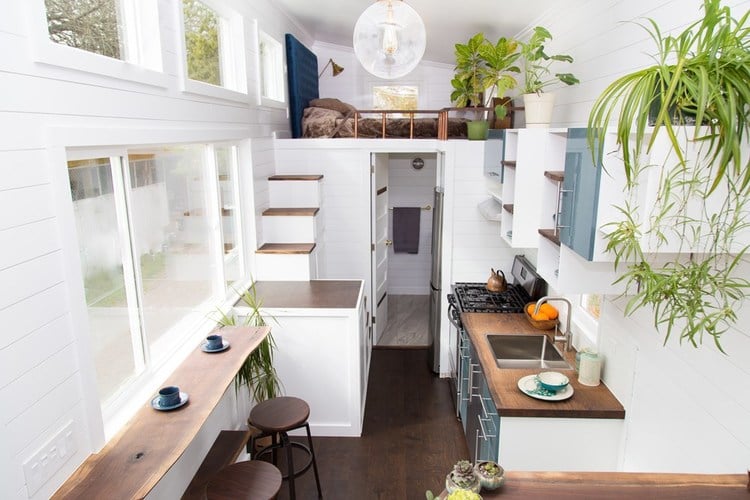
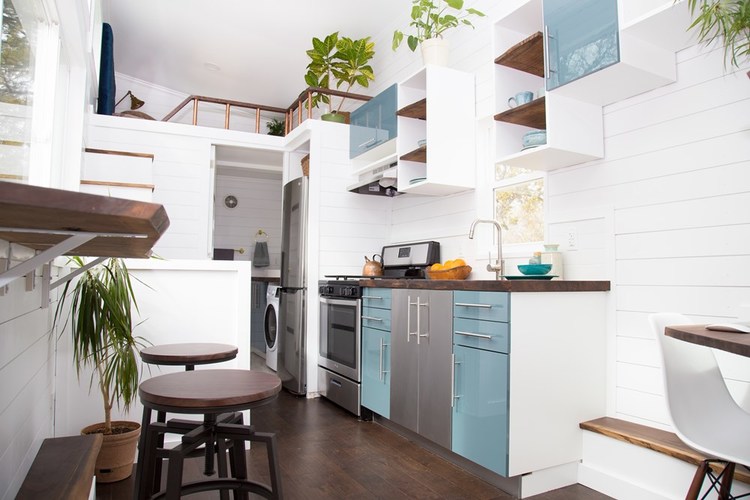
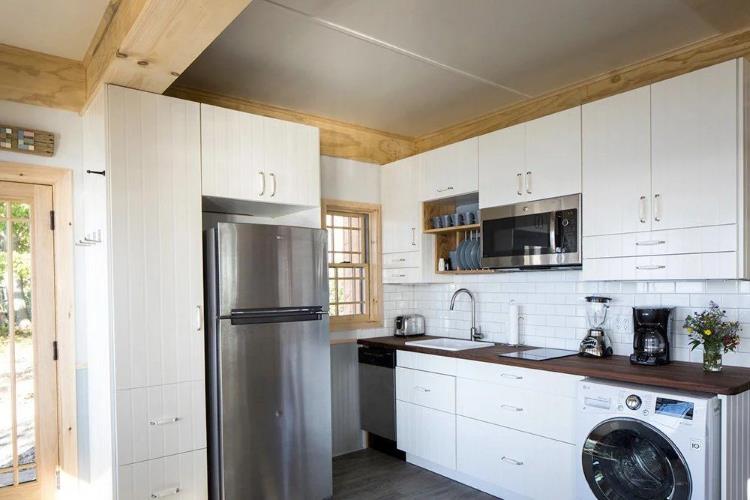
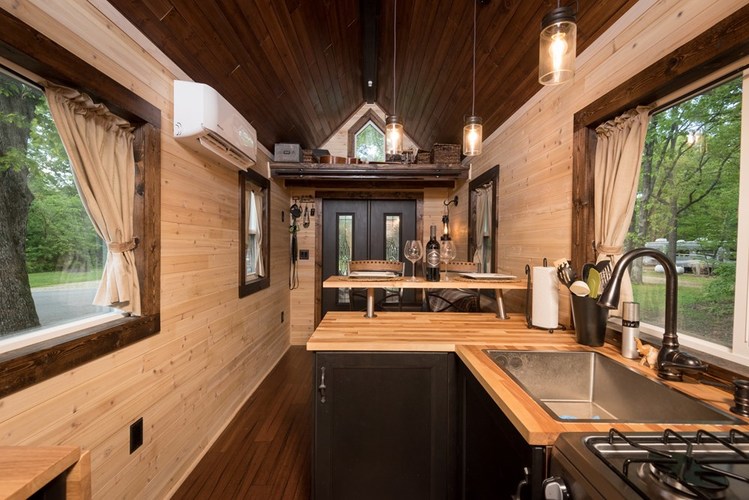
The gallery below shows off some of our favorite tiny house kitchens, picked from our amazing amateur tiny house roundup article. There is a wide range of kitchens shown here, suiting various tiny house layouts: